Once you have a sense of balance when the horse is in motion, you are ready to coordinate this into what I call the following seat. I’m going to introduce the movement of your horse’s body and how you can best coordinate with it instead of interfering. I’ll start with ground exercises, then move on to some mounted work, but first I need to lay down an anatomical foundation. I tell my students to “ride with their bones,” which allows the muscles to do their parts easily and with maximum efficiency. Riding with your bones requires an understanding of skeletal anatomy–where the bones are and how they articulate.
Knowing the Bones
Pelvis and lumbar area: The pelvis consists of the sacrum and the two ilia. The sacrum, composed of the last five spinal vertebrae fused together, forms the back of the pelvis, and the ilia forming the two sides wrap around to the front where they attach at the pubic arch. These bones are so firmly attached to each other by ligaments that they seem to be a single solid structure shaped somewhat like a bowl. The sockets of your hip joints lie on both sides of the pelvis. The balls at the end of your femurs (thigh-bones) fit into these sockets. The pelvis hangs on the hip joints much like a hammock supported by your legs. The dense, heavy bone at the bottom of the pelvis helps to stabilize it. Your hip joints not only supportyour entireerect weight, but they, along with the joints in your knees and ankles, permit immense flexibility.
The weight of your torso coming down from the spine through your sacrum lands somewhat behind the upward support and thrust of your legs. This construction contributes a slight shock-absorbing capacity to your pelvic region. This shock-absorbing mechanism continues throughout the length of your spine, with the forward curve of the lumbar area, a backward curve in the thoracic (rib cage) vertebrae and another forward curve in the cervical (neck) area.
These are all moderate curves that provide a cushioning effect for your back. If any of the curves is too pronounced or too straight, your back suffers stress and works inefficiently. If you hold yourself in a swaybacked posture (lordosis), the lumbosacral joint is placed directly above the hip joint. This very common posture eliminates nature’s intended shock absorber,producing jarring and pain.
Conversely, if you push your lumbar spine into a roached, or slumped, position you have a different, more difficult problem: The tucked-under pelvis locks you on the back of your seat-bone “rocking chair rockers” without the slightly forward curve of the supporting spinal cushion. Thus correct positioning of your back, starting with your pelvis, is important for your balance, resilience and comfort.
Although your center and your center of gravity are not the same thing, they are located in the same pelvic area, explaining why your center must be over your feet (or your feet under your center) in order for you to be in balance. Test this out while you are standing upright, feet somewhat apart, with your hips, knees and ankles bent. This position is similar to the half-seat on your horse. Notice that your center remains over your feet. If it did not, you would fall over. Move back and forth between a deep, upright seat and a half-seat, and notice how your three joints adjust and coordinate to give you a soft balance while in motion. You will notice when you bend your joints into your half-seat that the distance your hip joints move back is the same distance your knees move forward. The movement is distributed equally between the joints.
The muscle attachment between the pelvis and the rib cage is important to your posture. The greater psoas muscles run from the front of the lumbar spine across the front of the pelvis and attach to the upper inner thighbone. The diaphragm crosses the torso below the rib cage, arcing up into the chest cavity with a big root attaching to the lumbar spine. The fibers of the diaphragm’s root intermingle with those of the top of the psoas. This means that breathing with the diaphragm can help engage the psoas muscles, a very important influence on your seat, balance and posture.

Rib cage: Above your pelvic and lumbar area, your rib cage consists of 12 pairs of ribs with one end of each rib attached to one of your 12 thoracic vertebrae. These attachments allow some limited hinge-like motion. However, this is a part of the body where tension often severely limits available mobility. The ability to lift and expand the rib cage at those hinges is very important in breathing. The fronts of the ribs (except the bottom two “floating” pairs) are attached by cartilage to the sternum. Cartilage is movable, giving the rib fronts more mobility than the backs. As a result, many people use only the front of the rib cage to allow expansion of the lungs. In fact, allowing both front and back to move makes breathing more efficient.
Shoulder girdle: The balance and carriage of your shoulder girdle above your rib cage are also important. Your shoulder girdle consists of your shoulder blades (scapulae) in back and collarbones (clavicles) in front. In the front, the shoulders are attached to the skeleton where the collarbones meet the top of the sternum. Put your fingers at the top of your sternum where your collarbones meet (sterno-clavicular joint), and move your shoulders around with big motions to get acquainted with that joint. The whole shoulder girdle is supported by your rib cage as well as by muscles from your head and neck, permitting great mobility–unless tension has locked up this area.
The neck and skull: Of course you’re aware that your neck supports your head, but you may not realize that one-half of your neck is actually inside your head. The atlanto-occipital joint is the balance point of your head on the top spinal vertebra, called the atlas. To locate this important spot, place a finger-tip on the front cartilage of each ear. The atlanto-occipital joint lies directly between your two fingers, well forward under your skull and very near the hinge of your jaw. While continuing to hold your fingers on your ears, “bobble” your head so your face moves slightly down and up. To measure the distance from the back of your neck to the atlanto-occipital joint, or “bobble spot,” put your thumb in your ear and your index finger on the back of your neck. You will notice that the distance between your thumb and finger is quite far–about three inches or more–which means the spine is attached to the head farther forward than we often imagine.
Ground Exercises for Self-Awareness
The slippery spot: If you habitually carry your head and neck in a forward position, do this little easy up-and-down wobble-bobble of your face for a bit, keeping your fingers on your ears. Without your consciously aligning them, your head and neck will come up and back more directly over your torso. Now take your fingers away from your ears and feel the new balance of your head. It should feel effortless compared to your old head carriage.
This bobble spot feels like a tiny slide, a slippery spot. There are actually two spots, though they give the sensation of being one. The top of your atlas has two areas resembling tiny, parallel, shallow bathtubs that hold the two prominences of the occipital bone, the supporting points of the skull. It feels as if these little slippery spots let these prominences slide somewhat forward and back on the atlas. This means that when the bottom of the skull slides a little back, the top of the skull goes an equal little bit forward.
To sense this little sliding motion, put your thumbs in your ears and your fingers on top of your head as if you were holding the rim of a wheel. The hub of the wheel is above the level of your eyes, halfway between the atlanto-occipital joint between your ears and the top of your head. Now bobble your head slightly so that your chin drops a bit. As your thumbs move back a tiny bit to follow this motion, your fingers move forward an equal amount. This little wobble between the atlas and the skull is the “yes” nod of the head. The “no” motion is just under it between the atlas and the axis, the second vertebra of the neck.
The front of the skull is heavier than the back; in fact, the entire skeleton is heavier in front than in the back. To compensate for this disproportion and keep us in balance, we have a series of interlocking muscles from the back of the neck all down the spine. Tension in the back of the neck is very common, and you can release it with the little wobble-bobble again. The resulting lightness and freedom in head movement release tight areas in the rest of your body. Each time you allow this tiny sliding motion, letting your face momentarily drop rather than lifting your chin, you feel a wave of softness at the back of your neck that travels down your back and allows your neck, shoulders and back muscles to feel long and wide. You also notice that your head feels as if it has lightened, as if it is floating a bit forward and up into space. This is only a momentary sensation. It isn’t a feeling you can maintain, but once you have found this “magical joint” that is responsible for the wobble-bobble, you can release it anytime you want–while standing around, riding a horse or driving a car.
Longer and wider: Every time you free your head and neck, as you have just done, your back gets long and wide, allowing the back of the pelvis to drop down. This movement, in turn, brings up the pubic arch (the front of the pelvis) as it engages the abdominal muscles to give the hip joints and legs greater freedom and allow the legs to drop down. This action is commonly called the “pelvic tilt,” implying that it is achieved by pulling the front of the pelvis up with the abdominal muscles, which is not the most effective approach. Try it both ways. The release method seems effortless, while the pull-up method puts tension in the body from the lower abdomen into the lower back. This tension also tightens the hip joints. When you release and lengthen the back, the pelvic tilt just happens. My shorthand when I’m teaching is to simply tell the student, “Lengthen your spine.” The delicate motion in the magical atlanto-occipital joint is vitally important for releasing tension so the head and body can come into balance.
Engaging yourself: When you have your horse balanced, his neck is soft and slightly arched and his head hangs easily from the poll where his spine connects to his skull. This release at his poll allows his back to be long and wide–long from poll to tail and wide through the rib cage and loin. Because his hip joints are free, he can curl his pelvis and loin, bascule at the lumbosacral joint and step more forward under his body with his hind legs. When he does these things, we often say he “engaged himself.” He is energized for new or greater movement, free to use his body and legs with maximum efficiency and brilliance. Now compare what these exercises have been doing to your own body. You have rebalanced yourself. Your neck is soft, your head is poised lightly, your back is long and wide with the pelvis engaged under you, and your legs and arms are totally free. You, too, can be efficient and brilliant. The concepts of “engaged” and “engagement” are, in fact, equally applicable to both horse and rider. When, with intent, you ask your horse to engage himself, you feel it in your own body and know he is having the same sensation.
All the above may seem like a long list of things to do in order to attain this feel. With practice, however, the process can quickly be shortened. Ground/center/grow can encompass the whole process, allowing you to have a following seat. Grounding gives you a sense of the sacrum and legs growing down to connect with the earth, while from your center you grow up through your long, wide back and your soft neck and balanced head. Presto! Your pelvic area becomes engaged, and you are ready for whatever may come next.
Mounted Body Awareness
At this point, a helper can either lead you at a walk or longe you with long side reins on the horse. In either case, allow the horse to walk freely at his own rhythm, neither holding him back nor hauling him along. For the moment, ride without stirrups. You can hold the reins on the buckle or not hold the reins at all. Try closing your eyes as your horse walks. You should find it pleasant to do this exercise with your eyes closed. However, if this is scary for you in any way, leave your eyes open until you become more comfortable with the sensations. Your awareness will be more profound with your eyes closed, but do not close them if it makes you feel precarious or anxious.
The upper body:Try putting one arm up over your head with the thumb toward the horse’s tail, elbow pointed forward and fingers pointing softly to the sky. Notice the increased receptiveness of your body to the horse’s motion. Do the same with the other arm. Think about softly stacking your body above your moving pelvis. Remember those receptors around your seat bones that allow your body to balance easily, one “building block” above another.
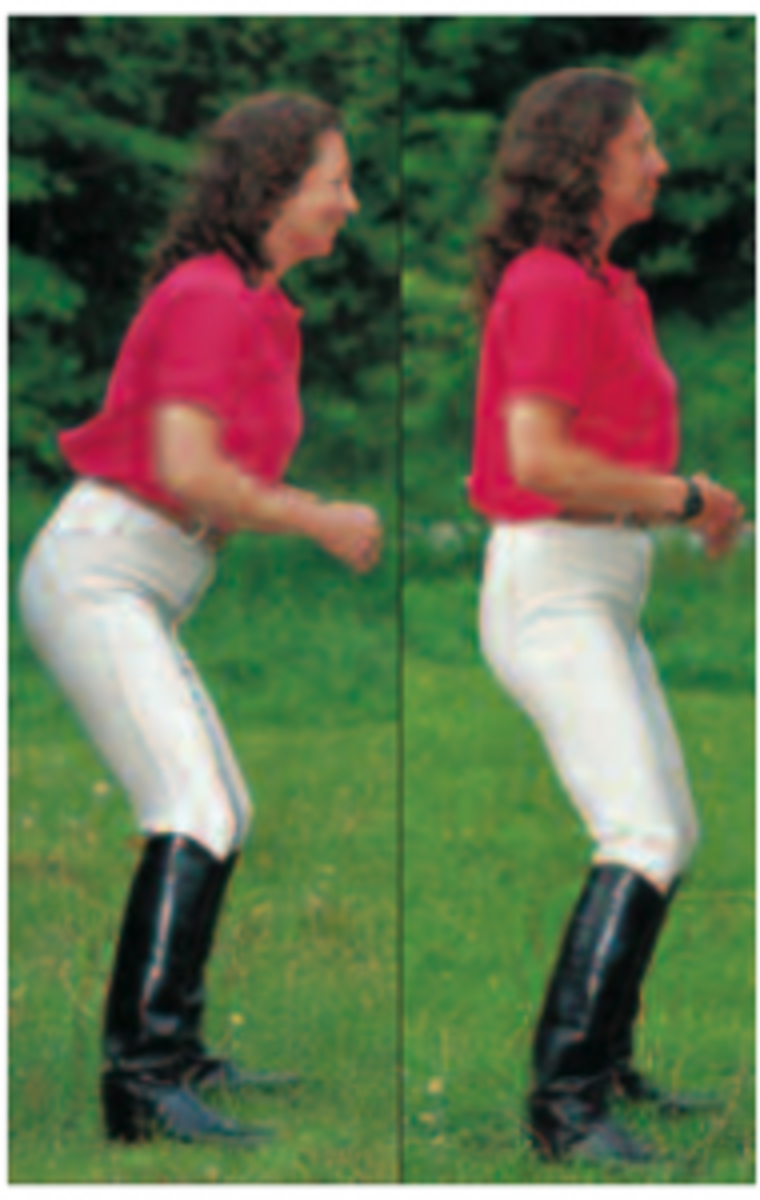
Allow them to work. Feel that your midriff stacks over your pelvis and your ribs over your midriff. Feel your shoulders hang over your ribs from your head and neck. Feel your stacking reflexes going on up through your neck to the base of your skull, between your ears and out through your head. Allow the horse’s motion to ripple up through your body. It is not always easy to simply hang your shoulders above your ribs, as shoulders have a tendency to tighten, especially in moments of stress. You may find yourself riding round-shouldered, with your head forward, the back of your rib cage bulging and your center hanging forward through your belly.
Tight shoulders cause your carefully stacked body to tumble out of balance. To cure this problem, try imagining a bungee cord being pulled straight up out of the top of your head. Imagine it pulling you up like a puppet, and feel the upward surge of energy through your whole body. As the cord gently pulls and releases, let your shoulders open and your sternum rise. As the bungee cord continues to pull, let your center settle down and roll back over your seat bones instead of hanging out in front.
Be a giraffe instead of a turtle, which draws its head in. The giraffe, with all his dignity, lets his neck get longer as he quietly approaches a tree. His back, neck and poll reach up, and he delicately takes a nibble from the leaves at the top of the tree. Imagine that you have giraffe shoulders hanging from that long neck. A giraffe moves as if there were oil between his shoulder blades and ribs. Let your own shoulder blades be as oiled and free in movement as a giraffe’s. To counteract the tendency to collapse the front of your body and tighten your shoulders, think of both the bungee cord and the giraffe.
The seat bones: Once you are comfortably balanced, your horse will probably have a relaxed, free walk. Instead of asking anything of him, simply experience the subtleties of the motion of his back. Become aware that the two sides of his body never do the same thing when he’s in motion. One side is always moving a little forward and up, while the other side is moving down and back. If you are following your horse’s motion, the two sides of your own body also move in different directions. Allow yourself to follow each side separately through all its movements.
Now notice the effect the horse’s movement has on your seat bones. Is he moving them forward and back? Is he moving them up and down? Does he move them sideways? He moves them in all these directions alternately. When one seat bone moves forward, the other slides back. When one is going up, the other is going down. Notice that your bowl-shaped pelvis is now experiencing a rather pleasant wobble. Let that bowl balance over the seat bones and softly move as it follows the horse’s back. Your lower back will have to be released just enough to allow for this gentle movement. It’s as if you were sitting on undulating water; the ball in your center can float quietly within the pelvic “bowl.” A young, not- yet-muscled horse produces a lot of motion in his back, but as he becomes more correctly muscled, his back comes up under the saddle and through the loin, making him much more stable and easy to sit on.
The legs: Now become aware of your hip joints. Remember where they are, and put your fingers on them if you want by touching either side of your pelvis, low down and halfway back. Notice how the horse’s movement gives a rotary motion to the leg in the socket. It is a backward rotation, and because of the alternating motion of the horse’s sides, it feels as if you are pedaling a bicycle backward. This rotary motion moves the entire thigh, including the knee, which also pedals slightly backward. Notice that your knee points out, forward and down as your thigh lies on your horse. The horse’s back moves less than his sides, especially as he becomes better muscled, so it’s increasingly important as your horse advances that your hip joint remains free enough to let the thigh move independently of your quiet pelvis.
Once you are aware of the motion of the knee, notice what is happening to your lower leg. It is pushed by your horse’s barrel, first to one side, then to the other. When the horse puts one hind foot on the ground for support, he puts his belly–a substantial weight–over it, and that side of his back stabilizes. As he moves into the next step, the belly moves across over the other foot for support, and as the first foot comes off the ground and swings forward in the air, that side of the back activates. Your lower legs can “follow” his belly in and under on one side, then in and under on the other side.
This “following” with alternate legs is purely an exercise in awareness of the belly, back and hind-leg motions of the horse. You should not actively ride this way as it will tend to make your horse waddle. When your leg follows your horse’s barrel in and under, starting the moment the hind foot comes off the ground, you can affect the motion of the hind leg while it is in the air. You cannot influence a horse’s leg while it is on the ground and carrying weight. So you will find the horse indicates the timing for your lower-leg aids through the motion of his body. At this point in your experience, however, just follow, and do not encourage the sideways motion of his belly. Simply accept all the horse’s motion.
The feet: Now come to a halt, and ask your helper to place your foot so that the stirrup is under what I call the “bubbling spring” point of your foot. The outside edge of the stirrup iron should be aligned with, but not touching, the base of your little toe. The bottom of the stirrup should be perpendicular to the horse’s body. Your toes will be slightly turned out, so the bottom of the stirrup iron will cross your foot diagonally just behind the ball of your foot. Your sole lies parallel to the ground, resting easily, not pressing on the stirrup. A soft flexibility in your ankles and knees prevents you from pressing too hard on the stirrup. In this way, your feet remain under your center and essentially horizontal to the ground as your horse moves.
Now ask your helper to slap the soles of your feet rapidly, giving special attention to the balance point of your foot, the bubbling spring, where the stirrup lies. Have her use both hands to slap the sole of the foot in this alternating sequence: ball-stirrup/heel-stirrup/ball-stirrup/heel-stirrup and so on. The bubbling spring is doubly stimulating: You become more aware of the soles of your feet, and you feel grounded. Being aware of your feet in order to ensure their grounding is essential to the establishment of balance and fluidity on your horse. During a lesson with my student, Saundra, I asked her, “Where are your feet?” They were in the right place, under her center, but she had no conscious awareness of them.
“Where are my feet? I don’t know. Down there, somewhere. I never thought about them much.”
“We need to wake your awareness of your feet as a part of you, as your bottom building block,” I said.
So, we went to work. At the halt, I manipulated her ankles and feet, slowly and gently turning the soles outward and inward and the toes up, then down. I got her to wiggle her toes inside her boots and rotate the ankles herself as I had been doing.
“Become aware of the soft soles of your feet,” I said. We talked about the bubbling spring, and I put her feet in the stirrups so that the bottom of the iron crossed under that spot. I slapped the bottom of the stirrup, and she was delighted.
“I have never felt my feet like that before!” said Saundra as she wiggled her toes some more to enhance the feeling. She did some work at the walk, then picked up the trot. For some time I asked her to think of nothing but her feet as she rode.
“Search for the feeling of your soft soles on the bottom of the stirrup,” I told her. “Wiggle your toes again, and feel each toe carrying its share of the weight. Allow your legs to be long, and find the sensation of the soles of your feet resting on the warm, soft dirt of the arena. Allow yourself to be grounded. Don’t push on the ground, but let the ground carry your weight softly as you rise to the trot. If you push down, you try to put more weight on the ground than you actually have.
Just let your weight ‘be’ on the ground. The ground won’t let you go through it, so it pushes up against you. Allow that upward energy to travel up through the bubbling spring of your foot and on up through your center.” Once she discov- ered the sensation of her feet and the ground all connected and in communication, she became more stable and capable of riding with greater authority.
From Awareness to Influence
As your seat deepens with these exercises, your stirrups will feel too short. You now have a choice, depending on the type of riding you wish to do. If you want a longer stirrup but do not like stretching down for it, this is your chance to drop your stirrups somewhat but not too much. Your legs can be soft and longer, but your foot should still rest easily on your stirrup for gentle support. If you prefer a shorter stirrup, keep your stirrup the same length, and let your knee hang down. As you do this, you will feel the front of your knee below your kneecap looking at the ground. The knee moves a bit forward as it drops, your lower leg moves back, and your foot rests softly in the stirrup directly under your seat bones. Let your knee in front of the stirrup leather feel as heavy as your heel behind your stirrup leather.
Notice now as the horse walks that your knee has to flex alternately with each stride, right and left. The back of each knee joint distinctly closes as your thigh and knee are pushed down, forward and up. Let the knees move freely. The foot is held in place while resting lightly on the stirrup, and though it can follow the horse’s belly in and under, it cannot drop way down with each stride. The action of the knee angle closing and opening slightly with each stride, coordinated with the soft movement of the hip joints and ankles, absorbs the difference in the amount of vertical motion between your seat bones and feet. You now have a very deep, strong seat, which, as you can feel, is not just your pelvis on the horse’s back, but the coordination of your balanced pelvis and your hip joints, thighs, knees, ankles and feet. All these parts working in harmony constitute your seat.
Now you can begin influencing the horse’s movement. As each of your horse’s strides moves your seat bones alternately forward and up, then down and back, focus on that circular pattern. To make this pattern clearer, drop your arms to your sides and shadow the movement of your seat bones with your hands. Your hands will describe alternating circles measuring six inches to a foot in diameter, and they’ll move as if slowly spinning a wheel backward or pedaling backward on a bicycle. Keep your hands circling for a moment while allowing your seat to follow the alternating thrusts of the horse’s body. Now notice that because the sides of the horse move more than his back, your hip joints are absorbing the difference; they are the backward-pedaling leaders coordinating the motion of your seat bones and legs.
“Volume” control: Where does the directive for this motion come from–you or the horse? The horse creates the motion, but you, the rider, enhance or inhibit it according to what you do. Note that the horse’s stride is long and free when you easily follow his body. Now try driving or pushing with your seat bones. What happens to his stride? It becomes shorter and stiffer.
You can use the backward-pedaling action to change the length of your horse’s stride. The musical term pianissimo might help you understand this idea. When music is pianissimo, it becomes quieter without changing rhythm.
Similarly, as you walk your horse, try decreasing the motion with which you follow the pulsations of your horse’s back and sides. Subdue, but do not stop, the pedaling of your seat while still maintaining the rhythm. Stay soft; do not stiffen; keep breathing. This is riding pianissimo. Notice how the horse’s stride becomes shorter without changing rhythm.
The opposite of pianissimo is crescendo. In crescendo, music increases in volume without changing rhythm. Try this image with your backward-pedaling hip joints. Expand the pedaling circles while maintaining the same rhythm. You will feel your horse step farther under you with longer strides. The concepts of pianissimo and crescendo combine well with the image of your backward-pedaling hip joints and, by visualizing smaller or larger circles, can be used at any gait to decrease or increase your horse’s stride. As always, first practice at a walk, so you can slowly become familiar with the concepts and sensations.
To increase your understanding of the pianissimo-crescendo exercise, try applying it incorrectly. For instance, experiment doing it with hard eyes or while holding your breath. Try it while locking your neck and head, or move in a different rhythm from your horse. Your horse will respond with stiff strides lacking in rhythm. For comparison, do the exercise again correctly. The easy rhythm of his strides will show you that you really need all the Four Basics, all the time.
What changes have happened to you and your horse during this time of being led? You are aware that your balance with your center over your feet is correct and easy. You have become increasingly conscious of what the horse’s movement is doing to your entire body, from the bottoms of your feet to the top of your head. Notice how you are using grounding and the Four Basics–soft eyes, breathing, centering and building blocks. Is your horse moving more freely with better rhythm in his motion? Is he stepping through more deeply with his hind legs?
Security at the trot: So far, all your following seat work has been done at the walk. Now it’s time to pick up the trot. In my book, I discuss trot exercises ridden in three different seat positions, but here we are only concerned with two–the half-seat and the rising trot.
Before you pick up a trot, you will need to find your balance in the half-seat. While your horse is standing still, find a position where you can slide your weight down onto your stirrups so your seat comes off the saddle an inch or so. You will be in the half-seat. Your knees and hip joints will be flexed, and your torso will be slanted forward. When balanced in the half-seat, your center will be over your stirrups and feet. If you dropped a plumb line from your center through your foot, your knees would be ahead of that line, your hip joints would be behind it, and your head and shoulders ahead of it. (A plumb line is a length of string with a weight on the end. Used by builders and surveyors, it always hangs down perpendicularly.) The tip of your toe will be under the tip of your knee. Rise up and down a few times as if doing a rising trot (also known as posting). Then practice some rising trot at the walk until balance is easy.
After resting, pick up the trot in the half-seat position, off the horse’s back but not rising up and down. Let your joints absorb the horse’s motion. For the sake of stability, you can rest your knuckles on the horse’s neck in front of the withers at first until your balance becomes secure. When you’re comfortable, start rising to the trot in that balance, then after five or six strides return to the half-seat. This repetitive Two Seats exercise increases your comfort and security in each seat, allowing you to switch fluidly from one to the other. Usually riders instinctively assume a 45-degree angle with their upper bodies while in the half-seat, but you can derive more benefits by varying that angle. Try a somewhat more upright position by allowing your knees to flex more forward, your hips to come more under you, your shoulders to come up and your hip joints to be more open. Or, conversely, flex your joints more deeply to lower your torso to a more horizontal position. The Two Seats exercise, done at rising trot and half-seat in any of these positions, will substantially improve your balance and stability.
As you learn to ride with your bones through these unmounted and mounted exercises, you will become more aware of how your body–in all its different parts–can coordinate with the horse’s movement. The resulting following seat not only harmonizes with your horse’s action, but it is the pathway for clear, precise directives that your horse will willingly obey.
This article originally appeared as an excerpt of the book “Centered Riding 2: Further Exploration,” in the June 2001 issue of EQUUS magazine.